Ever feel as though your work has too many moving parts to manage? That’s understandable – you’re likely juggling at least a half dozen tools and tasks. When that’s the case you can’t dedicate the necessary time to creating groundbreaking content.
“It’s not that I’m so smart, it’s just that I stay with problems longer.”
-Albert Einstein
While Einstein did have an intellectual edge over many people, the wisdom of his words rings true. Dedication and hard work tend to matter more in the long run than natural gifts. But you can’t apply the required time and energy to your content creation if you’re always busy managing some other aspect of your business.
That’s where Click Up comes in. This ClickUp tutorial will teach you everything you need to get started with this amazing productivity app.
Note: I am an affiliate marketer and this article does contain affiliate links to ClickUp and potentially other services you may find beneficial. If you follow my links and then make a purchase, I may receive a commission at no additional expense to you.
What is ClickUp?
ClickUp is a cloud-based productivity software which extends to mobile and desktop apps. This means you can use ClickUp anywhere on any device, whether you are on MAC/iOS, Android, Linux, or Windows. ClickUp provides a singe platform that integrates project management, spreadsheets, reminders and goal tracking, and much more. Best of all, it’s completely free to use so long as you don’t need more than 100MB of their cloud storage space.
ClickUp Pricing
If you’re wondering “is ClickUp really free?” or “how much does ClickUp cost?”, the information is all laid out clearly on their pricing page. You can use the platform for free (without having to provide any payment information) as long as your storage doesn’t exceed 100MB. After that they have monthly and annual plans you can choose from, both of which are unlimited and bring some extra features to the table.
Note: 100MB probably doesn’t sound like a lot, but it’s actually plenty so long as you don’t regularly upload files. If you only use ClickUp for planning and tracking purposes, it can be free forever.
ClickUp FAQ
There are a few questions that come up related to ClickUp quite frequently – here they are with simple answers!
Q – Is ClickUp secure?
A – Yes, ClickUp’s website and app are secured on AWS (Amazon Web Services). All interaction between users and ClickUp systems are encrypted with 256-bit SSL (the same level of encryption used by your bank).
Q – How does ClickUp compare to tools like Trello, Monday.com, and others?
A – I’ve used Monday.com for a few weeks and Trello quite extensively. I didn’t enjoy the user interface of Monday.com, and while I liked Trello I found it less powerful and all-encompassing than ClickUp.
Q – What can I use ClickUp to manage?
A – Just about any project that you’re looking to manage online, whether individually or as part of a team.
ClickUp Features – What Does It Do?
ClickUp allows you to create, assign, manage, and archive tasks. You can choose to view the tasks in a kanban board setting similar to Trello, a chronological list, a calendar, or a few other formats. ClickUp also gives you the ability to manage deadlines and reports, and integrates with every third party service you need.
It’s honestly difficult to reduce the scope of ClickUp to a single paragraph. One of its coolest features is that you can set goals which automatically let you know when you hit certain milestones.
ClickUp Integrations
ClickUp integrates effortlessly with many applications including Google Drive, Google Calendar, Slack, GitHub, and Dropbox. This makes it easy to manage projects from different platforms, but it also gives you a way to extend your forever free account. By storing files in Google Drive or Dropbox instead of the Click Up servers, you can make your 100MB last a long time.
If you’re familiar with integrations and automation, you may be wondering “does ClickUp integrate with Zapier?” – It does! In addition to the long list of native integrations, ClickUp can connect to another 2000+ apps via Zapier.
ClickUp Tutorial – How To Use ClickUp
This section will outline a simple process for getting started with ClickUp. In order to keep things simple, I’ll assume that we’re looking to plan a blog. First go to the ClickUp homepage at clickup.com. At the time I’m writing this, it looks like the picture below.
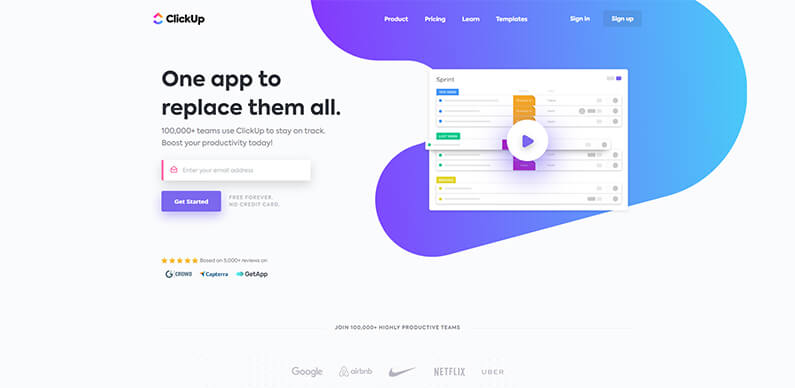
Take a look at the pricing or other pages if you like, or just put your email in and click the friendly “Get Started!” button.
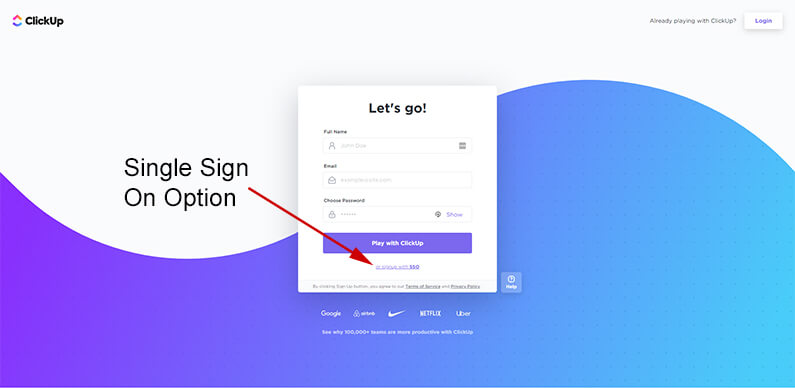
On the next page, it’s important to note that you have multiple options. You can either sign in with with your name, email, and password OR you can click on the “signup with SSO” link at the bottom.
What is SSO?
SSO means single sign-on. You may be familiar with it if you’ve ever signed into a website using Google or Facebook rather than creating a separate account. SSO is a good option for both security and convenience purposes, but you may want to sign up with a separate account for your own reasons.
After you choose your sign on method, you’ll arrive at the following page:

This is ClickUp’s antispam process, used to confirm that you have an active email address and are not a bot. The email should arrive quickly, so check your inbox, copy and paste the code, and then click verify.
ClickUp has an easy, interactive setup process, but I’ll walk you through it here so you’ll know what to expect.

Click on “Let’s do it!” to start the setup wizard. First you’ll get the chance to set your avatar’s default color – don’t worry, you can change this later! You can also customize it with a picture.
Any time you’re ready to progress to the next step, click on “I’m happy so far”.
After selecting your avatar color, choose a theme color and continue (again, these are not permanent decisions).

Next up you get to choose from a list of apps that integrate effortlessly with ClickUp. There are time tracking browser extensions (including ClickUp’s own extension, which includes a number of functions) and calendar and cloud storage connections.

I chose to use ClickUp’s chrome extension as well as the Google Calendar and Google Drive integrations. Then I clicked “I’m done”.

Here you can invite other contributors to join your workspace. If you have anyone in mind you can invite them now, but I recommend setting up your space first and then inviting your associates. That way things will be ready to go when they arrive.
Click on “Play with ClickUp” to complete the setup wizard!
ClickUp Templates and Your First Workspace
This is the point where all of ClickUp’s options can become slightly overwhelming. You have a LOT of templates to pick from here, and if you don’t find an exact match it may be hard to decide. Don’t worry about that too much; ClickUp makes it easy to modify settings as you go, so if you find certain preferences or find optimizations they’ll be easy to incorporate later.

Since we’re doing blog management for the purposes of this tutorial, I selected Media and then Blog Management. Feel free to select whichever template you find suitable for your needs!
One of the few aspects of ClickUp I’m not sure I love is pictured above. When you create a space from a template, it gets auto filled with a bunch of sample tasks/cards. While I can see the utility of this, I feel like it’s just as likely to overwhelm less tech savvy users.
Fortunately ClickUp realizes that all the options they present can be confusing, so there’s a series of built in popups with video tutorials. I recommend watching each of these at least once, especially if you’re not familiar with productivity software.
The videos open in a lightbox when clicked, and provide some really valuable insights from the product creators. Here’s a screenshot of a clip where they described the nature of ClickUp workspaces.
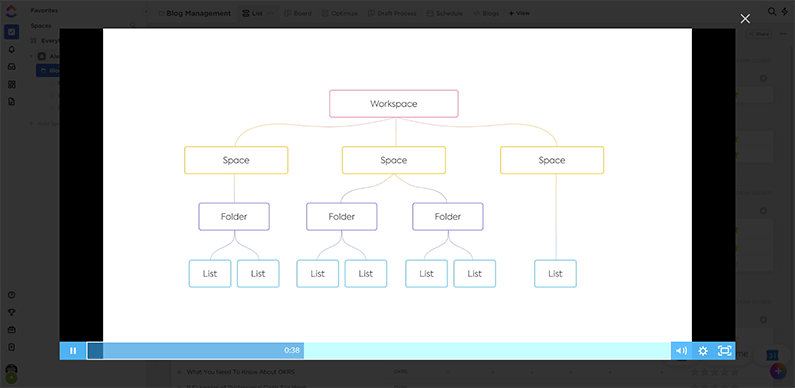
To briefly break it down, when you create a ClickUp account you get what they call a workspace. Within that workspace you can have a virtually unlimited number of spaces, which in turn can contain folders and lists. Tasks, also referred to as cards, populate the lists and folders.
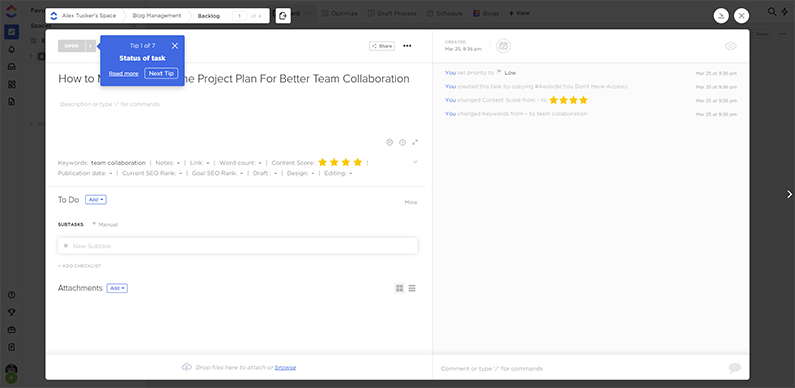
Below we have a screenshot of a task the first time I opened it. As you can see there are a series of quick tips which pop up, minimizing the complexity of the many options available.
One sub-feature of ClickUp that I love is the fact that you can customize task statuses, pictured below. This is really useful for creating unique workflows or for niche projects not already included in the templates.

You can either select a pre-made grouping of task statuses here, or you can create your own by clicking “+New template”, customizing the options, and then clicking save. From then on, the template you created will be available on all your spaces!
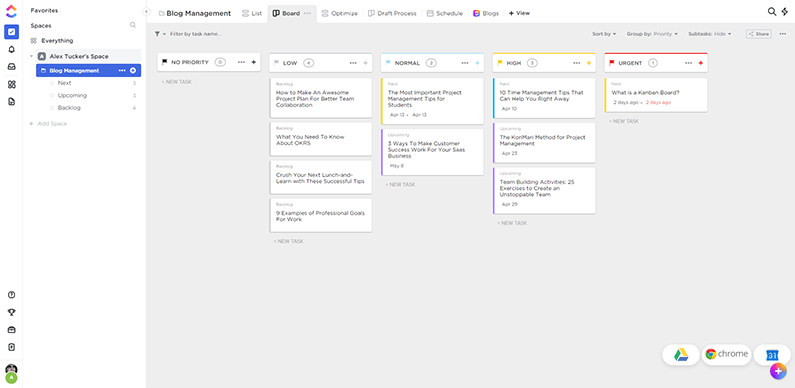
Here’s a view of my first space, kanban board style. Notice how neatly laid out the auto filled cards are. It takes only a moment to modify them or move them around, which is one of the reason kanban boards are so popular for project management.
I decided to clear the clutter and start fresh, so I closed all of the auto generated tasks and created a single new one. In order to add a new task to any column, all I have to do is click on “+ NEW TASK” under the appropriate priority.

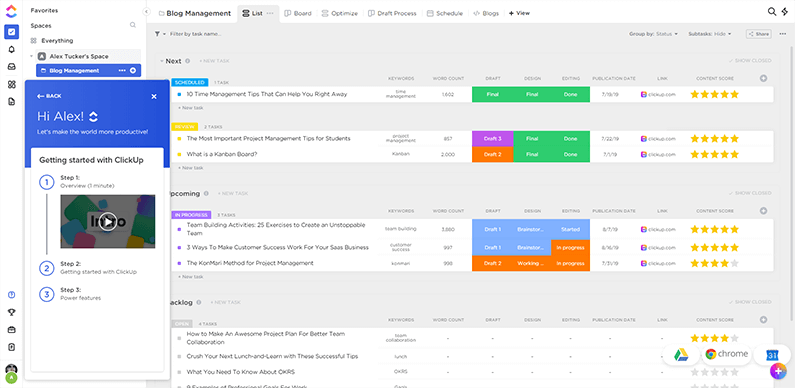
This tutorial became my first task in my blog management space. I could easily repeat the previous steps in order to create a second space related to other tasks, but for the purposes of this tutorial I’m just going to finish setting up my blogging space. As you can see below, it’s called “Alex Tucker’s Space” and is currently the only space within my workspace.
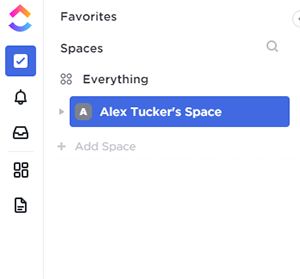
If I wanted to add a new space, all I’d have to do is click on “+ Add Space” in the left sidebar, pictured above. The truth is, there are a ton of options I could go over because ClickUp is a broad and powerful tool, but for the purposes of this beginner level tutorial, I’m just going to show how to set up goals and tracking for blog management.

After you’ve added some tasks, click on the trophy icon in the bottom of the left sidebar to access the Goals screen. It should look as pictured above; click on Set a Goal to get started.
A new side panel will open where you can fill out the goal name, owner, collaborators, deadline, and description. You’ll be the owner of the goal, and you can set access to private or to your space (it makes no difference if you haven’t invited anyone to the space).
I named my goal “Top Writer” and gave it the description “Become a top writer on Medium.” Once I filled out all the information and hit entre, I arrived at the following screen.

Targets in ClickUp Goals track whether or not specific tasks are completed, and let you know when you know when you’ve achieved your desired result. There are four types of targets; Number, True/False, Currency, and Tasks.
Since my goal is to become a top writer and I believe I can achieve that by publishing 6-8 high quality pieces of content on Medium each month, I chose a Number goal and set the target at 6.
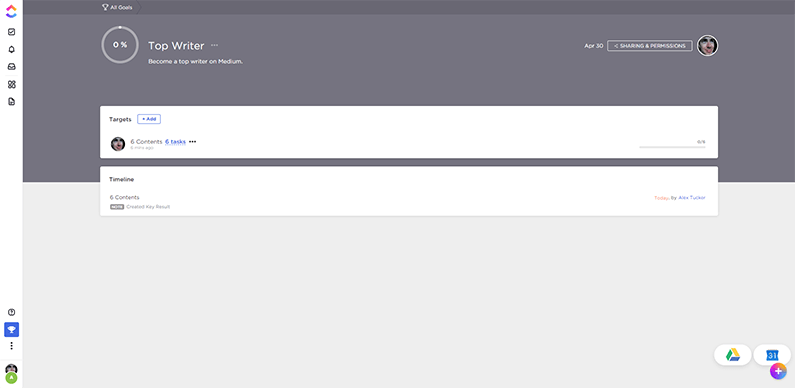
Now that I’ve set my target at 6, this goal will be completed when I’ve marked 6 relevant tasks as “done”.
When I return to my space and check the calendar view, it’s easy to see what tasks I have coming up, and when they need to be completed by.

ClickUp Notifications
When a task is overdue, or when anything else demands your attention, ClickUp will let you know by creating an alert in the notifications tab. This is an easy way to compile all of your most pressing work for the day into one place without having to think twice about what is do when.
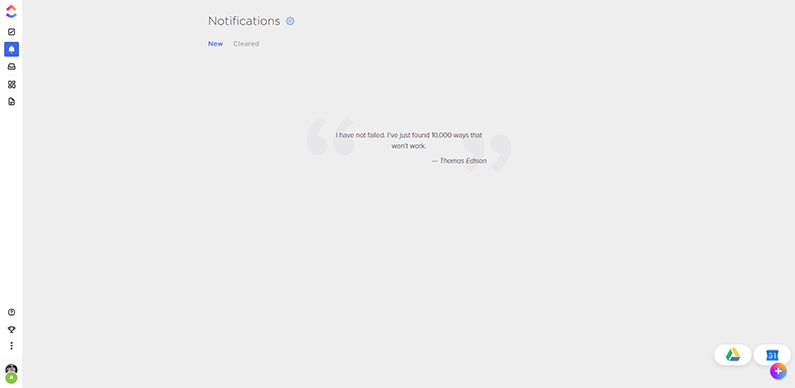
In the screenshot above I don’t have any notifications, so I clicked on the symbols in the bottom right corner to integrate my Google Drive and Calendar. Drive integrates with a couple of clicks, whereas calendar takes you to a new screen where you need to click on Connect.

Once your Google Drive and Calendar are connected, you can easily access documents via ClickUp and receive calendar notifications on all your devices.
The Beginner Blogger’s ClickUp Tutorial Conclusion
Well, now you know all about ClickUp and how to set up an account and a workspace with this free productivity software. You also know how use it to plan and schedule your blog on a kanban board, how to set goals associated with those tasks, and how to integrate everything with your Google apps.
Congratulations on coming so far in such a short time! If you need more help with your business, check out my How to Start a Business guide!